Encrypting Proxmox VMs with ZFS for Secure Virtualization
!!! IMPORTANT !!!
- This assumes a base ZFS setup already exists or you have done that
- An existing ZFS dataset CANNOT be encrypted
- We would need to create a dataset next to existing ZFS dataset then move over VMs
- Before moving, it may say it has low space. It will dynamically re-assign as things move between the datasets, updating free space and usage as long as the pool as a whole fits it.
Overview
Protecting virtual machines at rest is becoming a mandatory requirement for businesses running sensitive workloads. Proxmox VE makes this easier by supporting native ZFS encryption, allowing you to secure VM disks without relying on full-disk encryption at the host level. When implemented correctly, ZFS encryption ensures that even if the underlying storage is compromised, the data inside your VMs remains protected.
In this guide, we break down the three most common and practical methods for unlocking ZFS-encrypted datasets on Proxmox:
- Keyfile Unlock
- Passphrase Unlock
- Remote Key Unlock
Whether you’re running a home lab, managing a client’s infrastructure, or deploying Proxmox as part of a managed hosting offering, enabling ZFS encryption is one of the easiest ways to add strong, modern data protection to your virtualization stack. In the following sections, we’ll walk through each unlocking method step-by-step and outline best practices for operational security, automation, and disaster recovery.
ZFS encryption (using keyfile)
Using a keyfile is the easiest and most convenient method for enabling ZFS encryption on Proxmox. With this approach, the system automatically unlocks your encrypted datasets at boot without requiring human input—ideal for datacenters, remote environments, or MSP deployments where uptime and automation matter.
However, keyfile security is critical. The encryption key must be stored outside the encrypted dataset, otherwise the system won’t be able to load it during startup. For best security practice, always store the keyfile on a separate disk or dedicated boot device. This prevents an attacker from simply grabbing a single drive and immediately decrypting your VM storage.
Step 1: Check ZFS storage of system
- Open Proxmox dashboard, select SA-PVE4 then click on "Shell" button

- Display information about all ZFS storage pools on system
Show total storage stats for
zfs1
root@sa-pve4:~# zpool list
NAME   SIZE  ALLOC   FREE  CKPOINT  EXPANDSZ   FRAG    CAP  DEDUP    HEALTH  ALTROOT
zfs1  1.73T   133G  1.60T        -         -    42%     7%  1.00x    ONLINE  -
- Show how each dataset uses space inside
zfs1
- Pool
zfs1
- Datasets (volumes)
zfs1/vm-605-disk-0zfs1/vm-699-disk-0
root@sa-pve4:~# zfs list
NAME                 USED  AVAIL     REFER  MOUNTPOINT
zfs1                 176G  1.51T       96K  /zfs1
zfs1/vm-605-disk-0   103G  1.52T     87.8G  -
zfs1/vm-699-disk-0  72.2G  1.54T     44.2G  -
Step 2: Create encrypted ZFS dataset
- Open shell of
sa-pve4 - Create key
dd if=/dev/urandom of=/root/zfskey.bin bs=32 count=1
chmod 600 /root/zfskey.bin
chown root:root /root/zfskey.bin
- Create encrypted ZFS dataset
zfs create \\
  -o encryption=aes-256-gcm \\
  -o keyformat=raw \\
  -o keylocation=file:///root/zfskey.bin \\
  zfs1/encrypted
- Confirm
/zfs1/encryptedencrypted ZFS dataset is created
root@sa-pve4:~# zfs list
NAME                 USED  AVAIL     REFER  MOUNTPOINT
zfs1                 176G  1.51T       96K  /zfs1
zfs1/encrypted       192K  1.51T      192K  /zfs1/encrypted
zfs1/vm-605-disk-0   103G  1.52T     87.8G  -
zfs1/vm-699-disk-0  72.2G  1.54T     44.2G  -
- Check encryption configuration of
zfs1/encryptedencrypted ZFS dataset
*** If the keystatus is available, it means that the zfs1/encrypted encrypted ZFS dataset is UNLOCKED ***
zfs get encryption,keylocation,keyformat,keystatus zfs1/encrypted

NAME            PROPERTY     VALUE                    SOURCE
zfs1/encrypted  encryption   aes-256-gcm              -
zfs1/encrypted  keylocation  file:///root/zfskey.bin  local
zfs1/encrypted  keyformat    raw                      -
zfs1/encrypted  keystatus    available                -
- Mount encrypted ZFS dataset
zfs mount zfs1/encrypted
Step 3: Auto-unlock encrypted ZFS dataset
- Open shell of
sa-pve4 - Create
zfs-load-key@zfs1-encrypted.servicefile
touch /etc/systemd/system/zfs-load-key@zfs1-encrypted.service
- In
zfs-load-key@zfs1-encrypted.servicefile, add the following
[Unit]
Description=Unlock ZFS dataset zfs1/encrypted
Before=zfs-mount.service
After=zfs-import.target

[Service]
Type=oneshot
ExecStart=/usr/sbin/zfs load-key zfs1/encrypted

[Install]
WantedBy=zfs-mount.service
- Enable the "auto-unlock" service at boot
systemctl enable zfs-load-key@zfs1-encrypted.service

Created symlink /etc/systemd/system/zfs-mount.service.wants/zfs-load-key@zfs1-encrypted.service → /etc/systemd/system/zfs-load-key@zfs1-encrypted.service.
- Check "auto-unlock" service is enabled
systemctl is-enabled zfs-load-key@zfs1-encrypted.service
Step 4: Integrate encrypted ZFS dataset in Proxmox
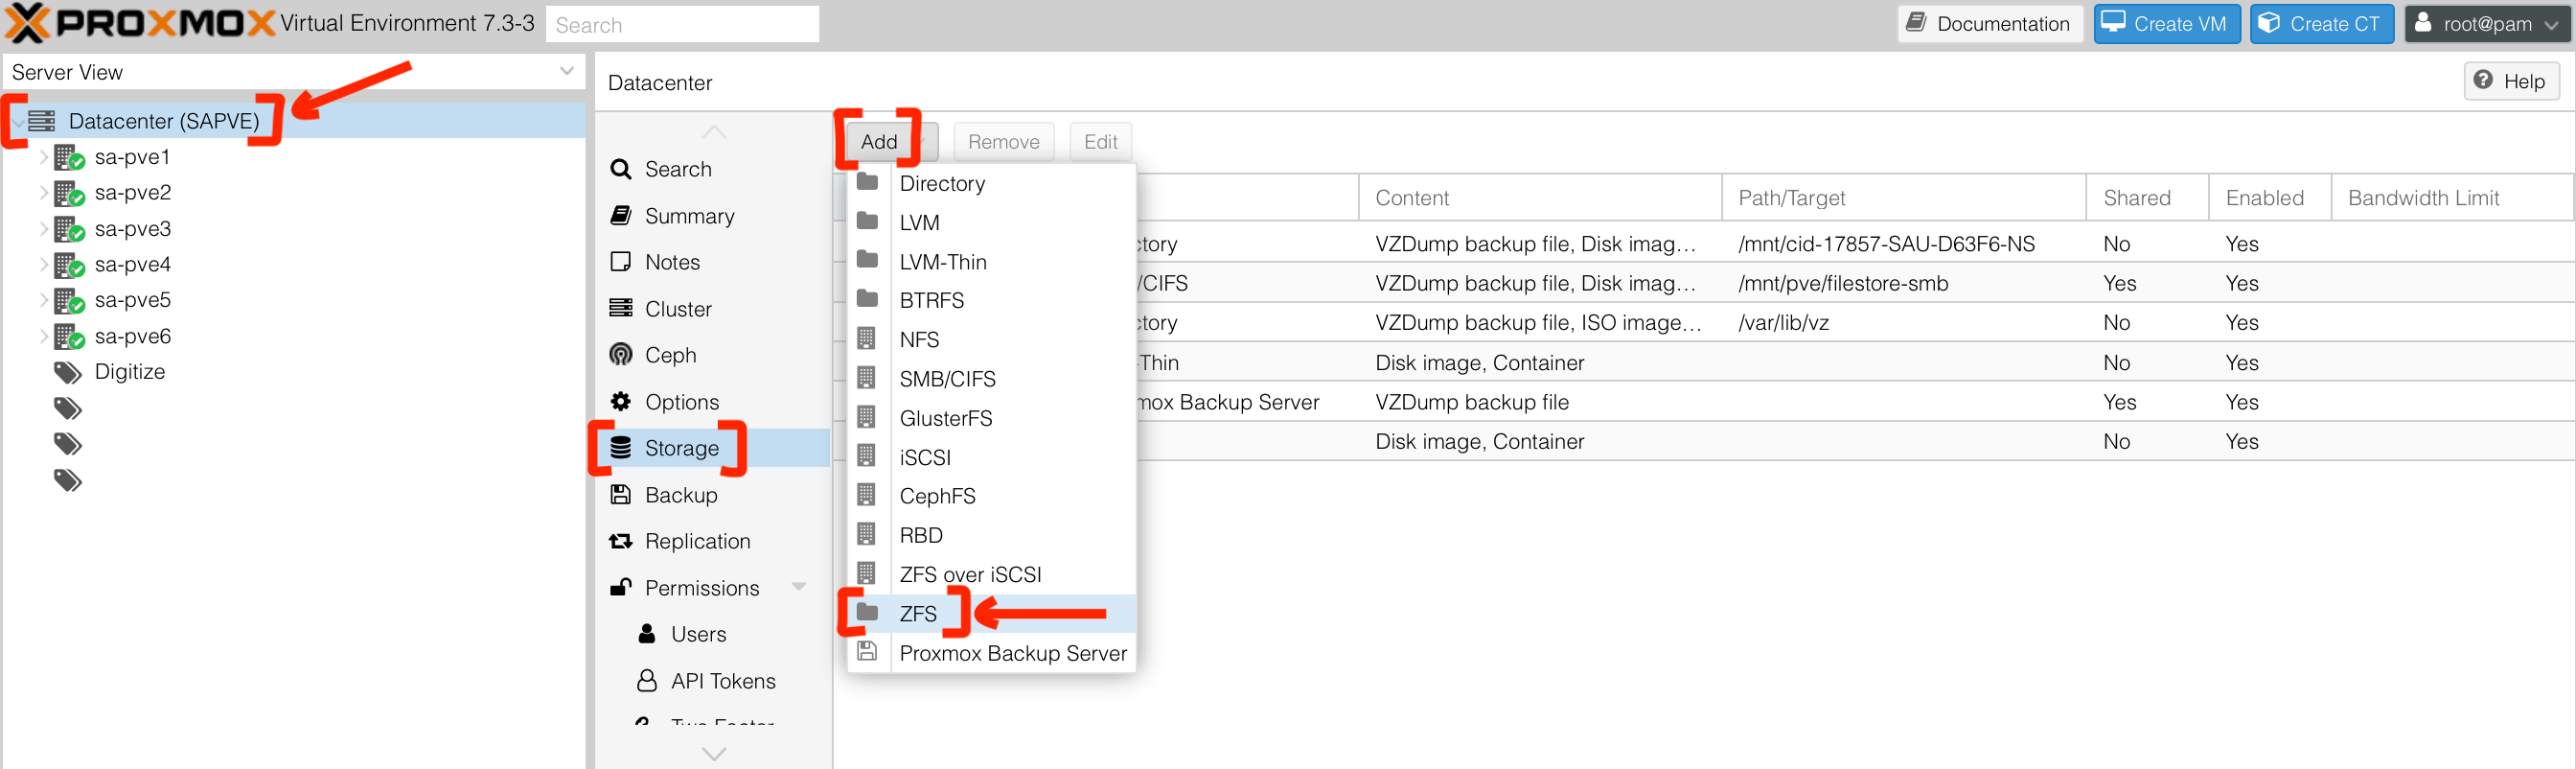
- In Proxmox dashboard, click on "Datacenter" -> "Storage" -> "Add" -> "ZFS"
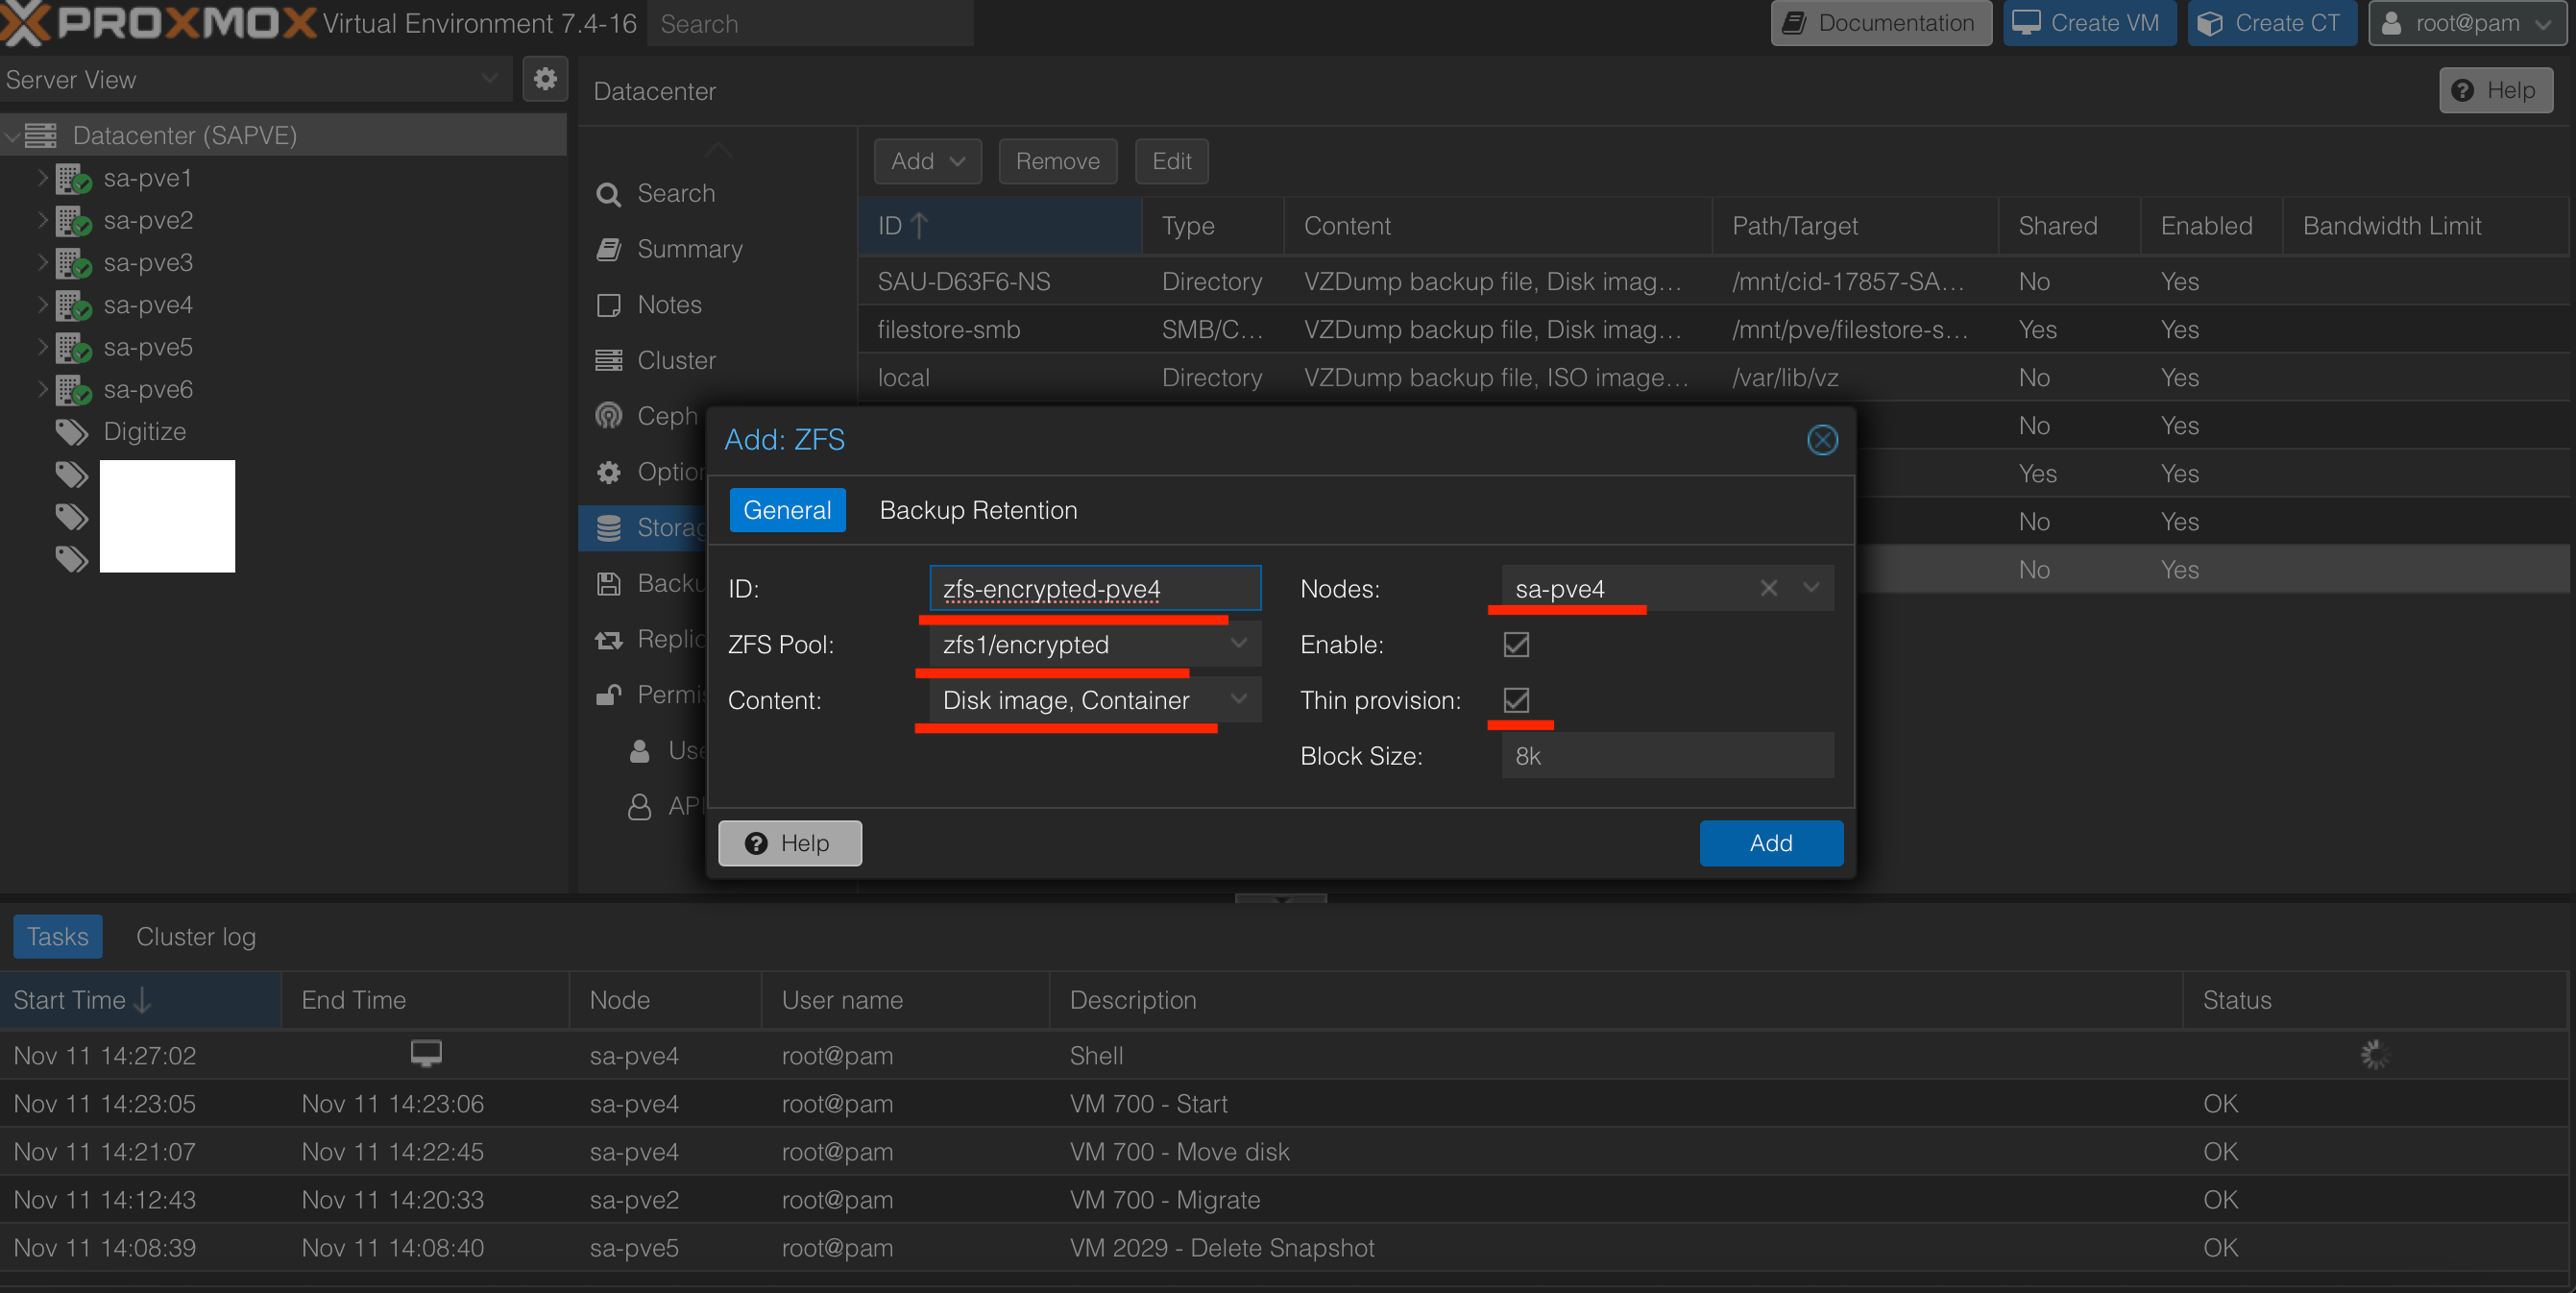
- Input
- "ID" with
zfs1-encrypted-pve4 - "ZFS Pool" with
zfs1/encrypted - "Nodes" with
sa-pve4 - "Thin provision" with checked
- "ID" with
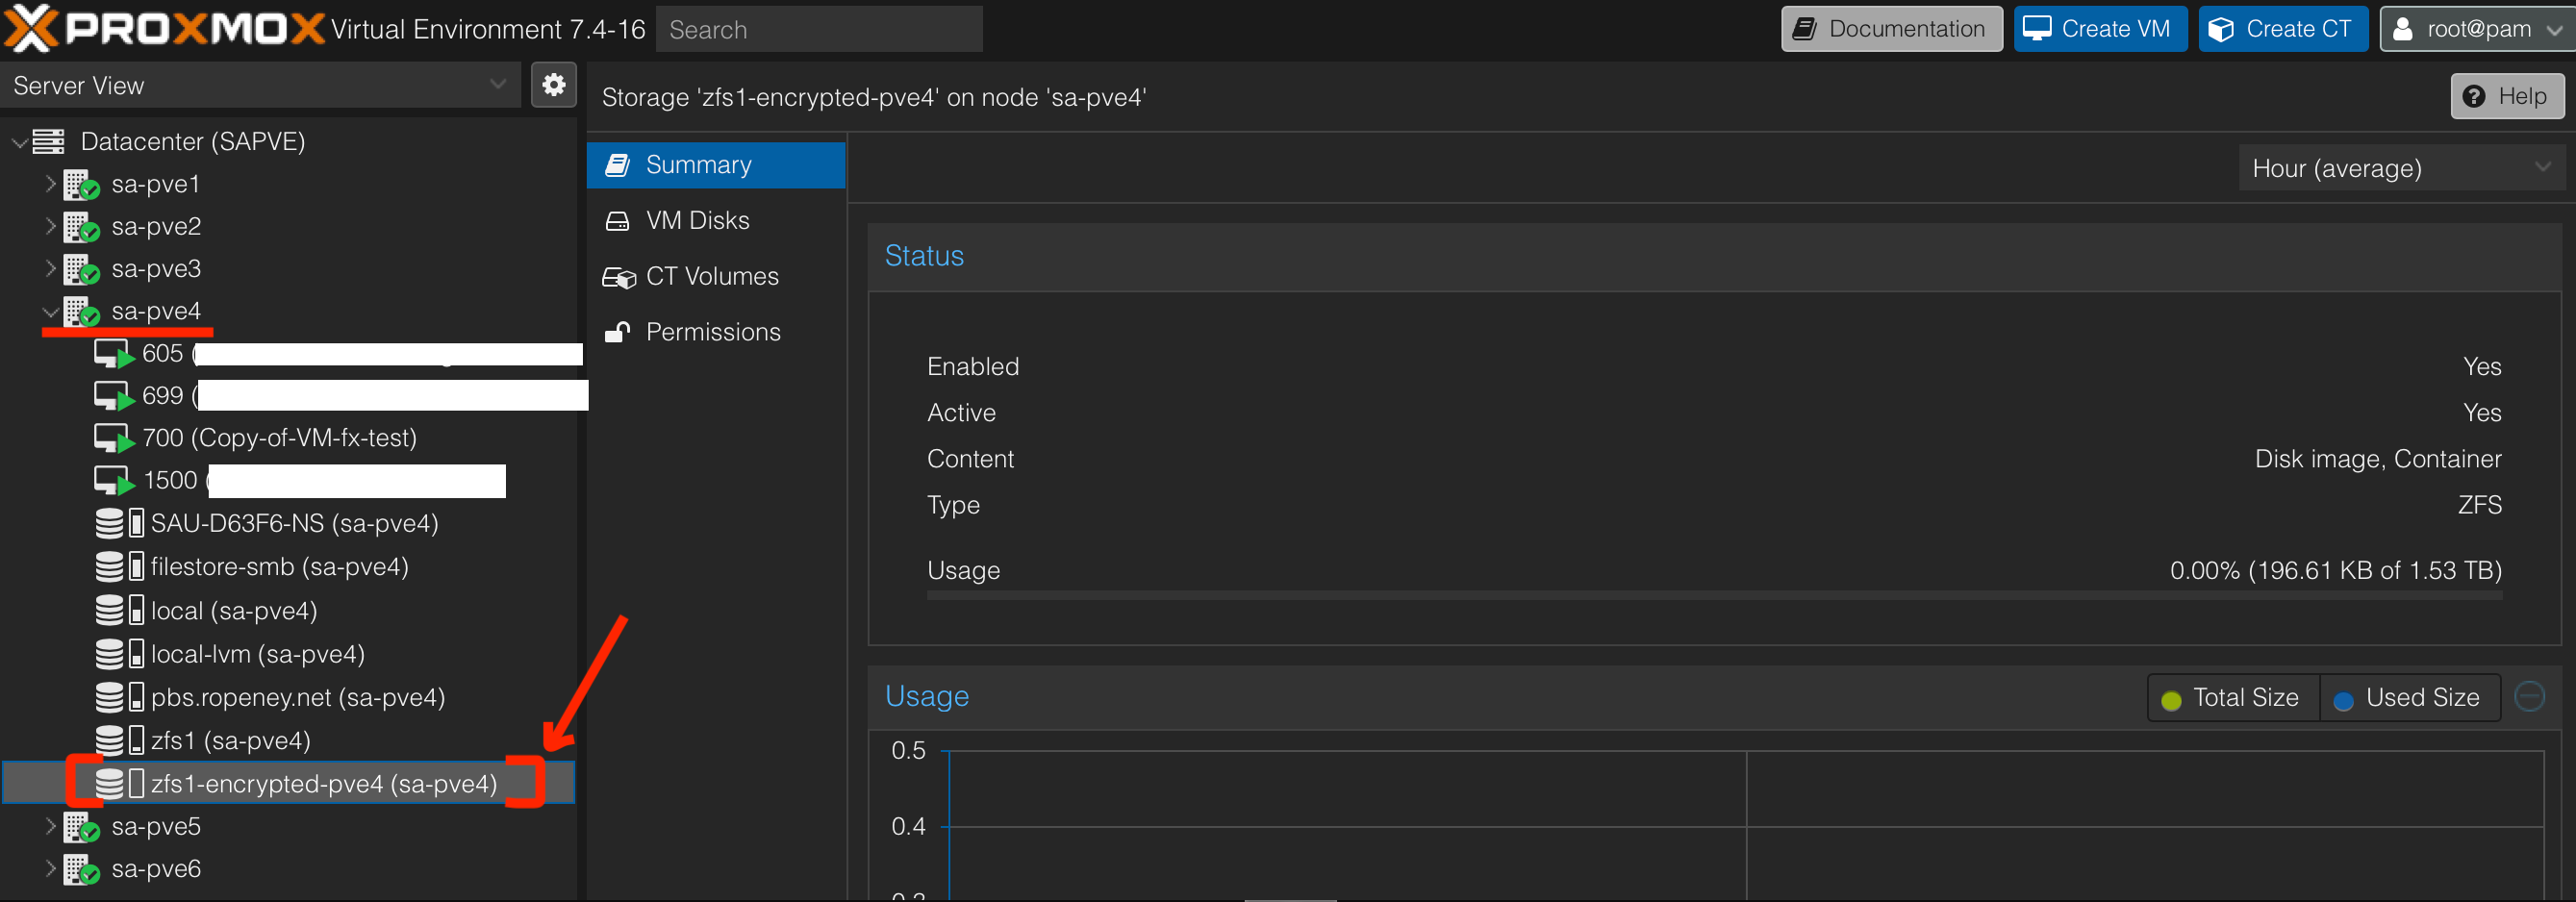
*** Note that if there is no zfs1-encrypted-pve4 for "ZFS Pool", please login to PVE dashboard directly to this node ***
- We can see that there is
zfs1-encrypted-pve4available insa-pve4node
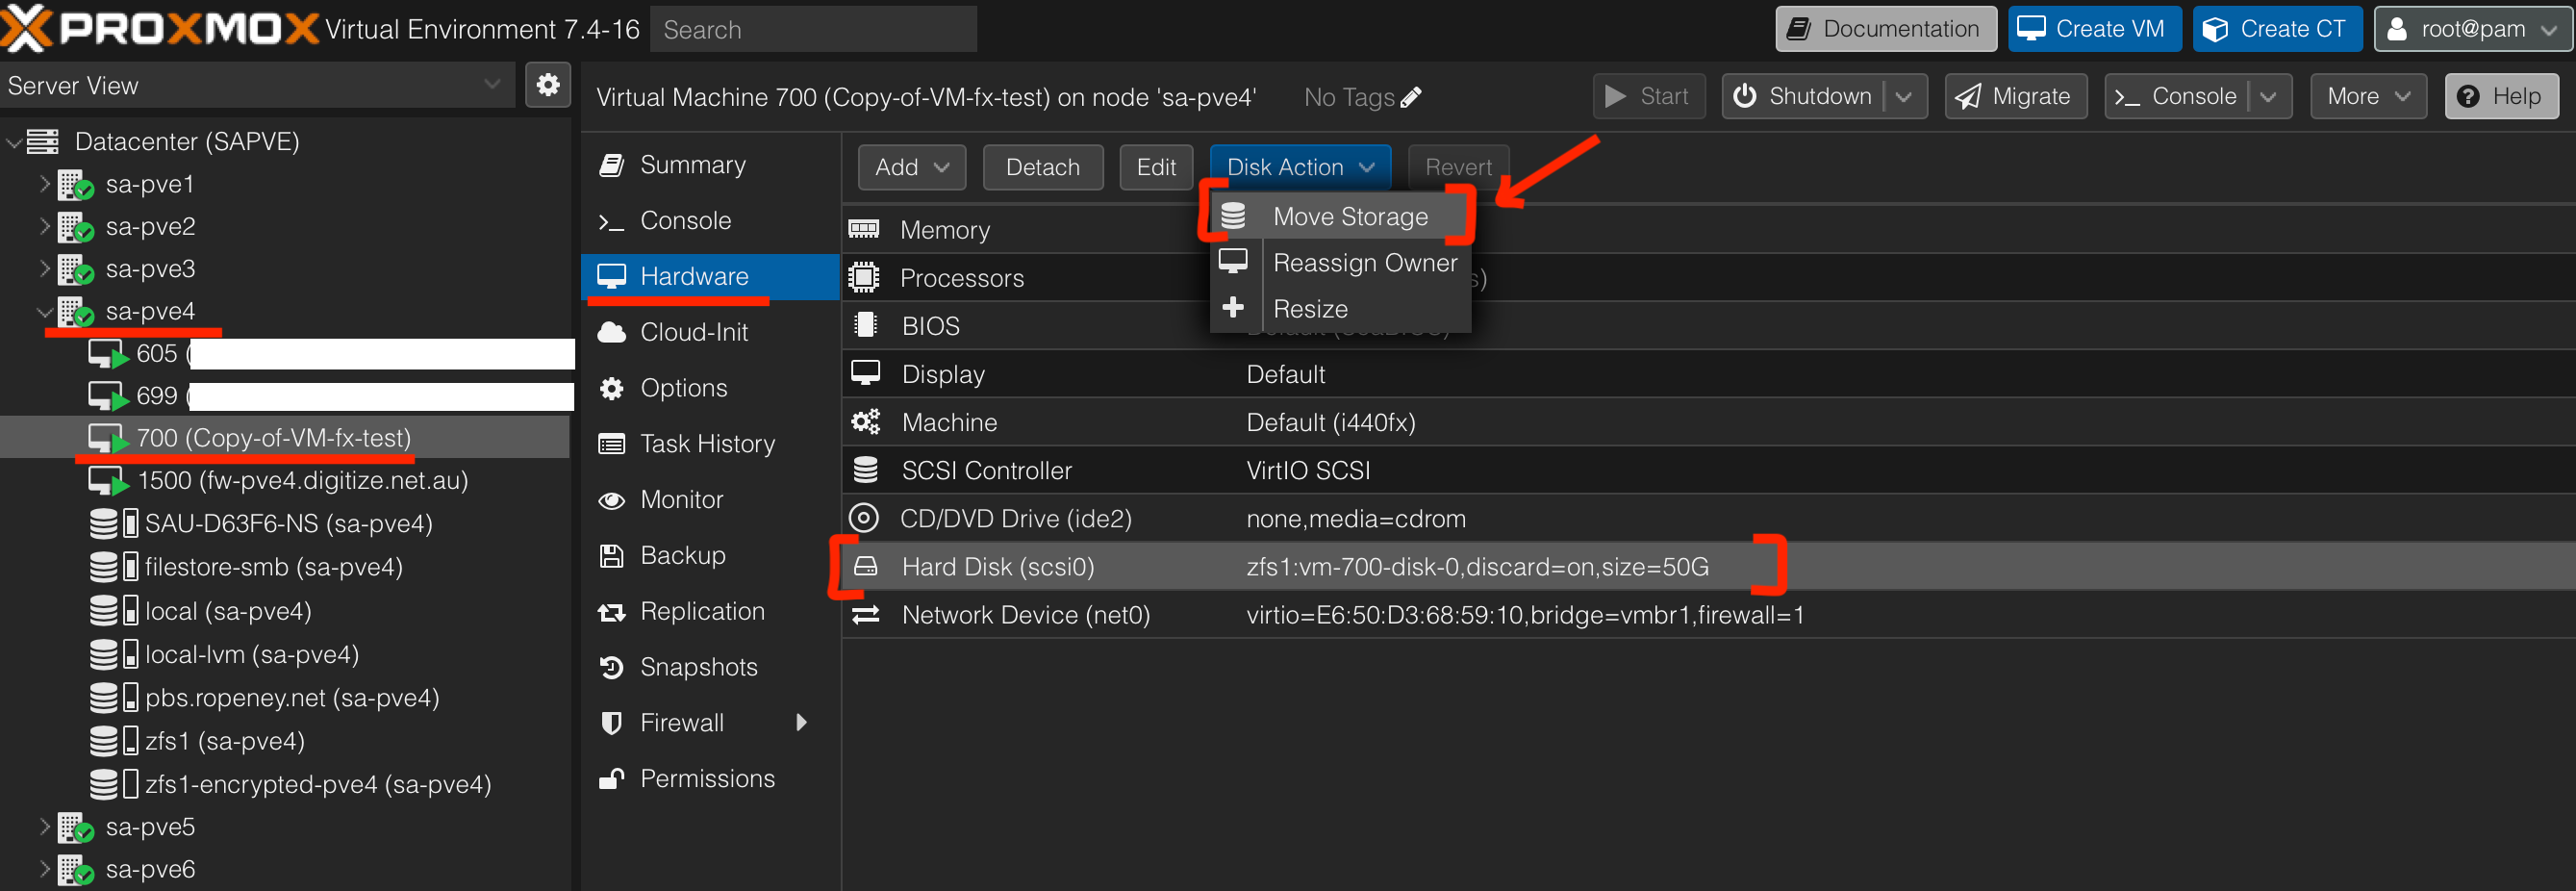
Step 5: Move VM's disk to encrypted ZFS dataset
- In shell of
sa-pve4, we can seezfs1/vm-700-disk-0
root@sa-pve4:~# zfs list
NAME                  USED  AVAIL     REFER  MOUNTPOINT
zfs1                  294G  1.39T       96K  /zfs1
zfs1/encrypted        192K  1.39T      192K  /zfs1/encrypted
zfs1/vm-4003-disk-0  33.0G  1.43T       56K  -
zfs1/vm-4003-disk-1  33.0G  1.43T       56K  -
zfs1/vm-605-disk-0    103G  1.41T     87.8G  -
zfs1/vm-699-disk-0   72.2G  1.42T     44.2G  -
zfs1/vm-700-disk-0   51.6G  1.41T     32.0G  -
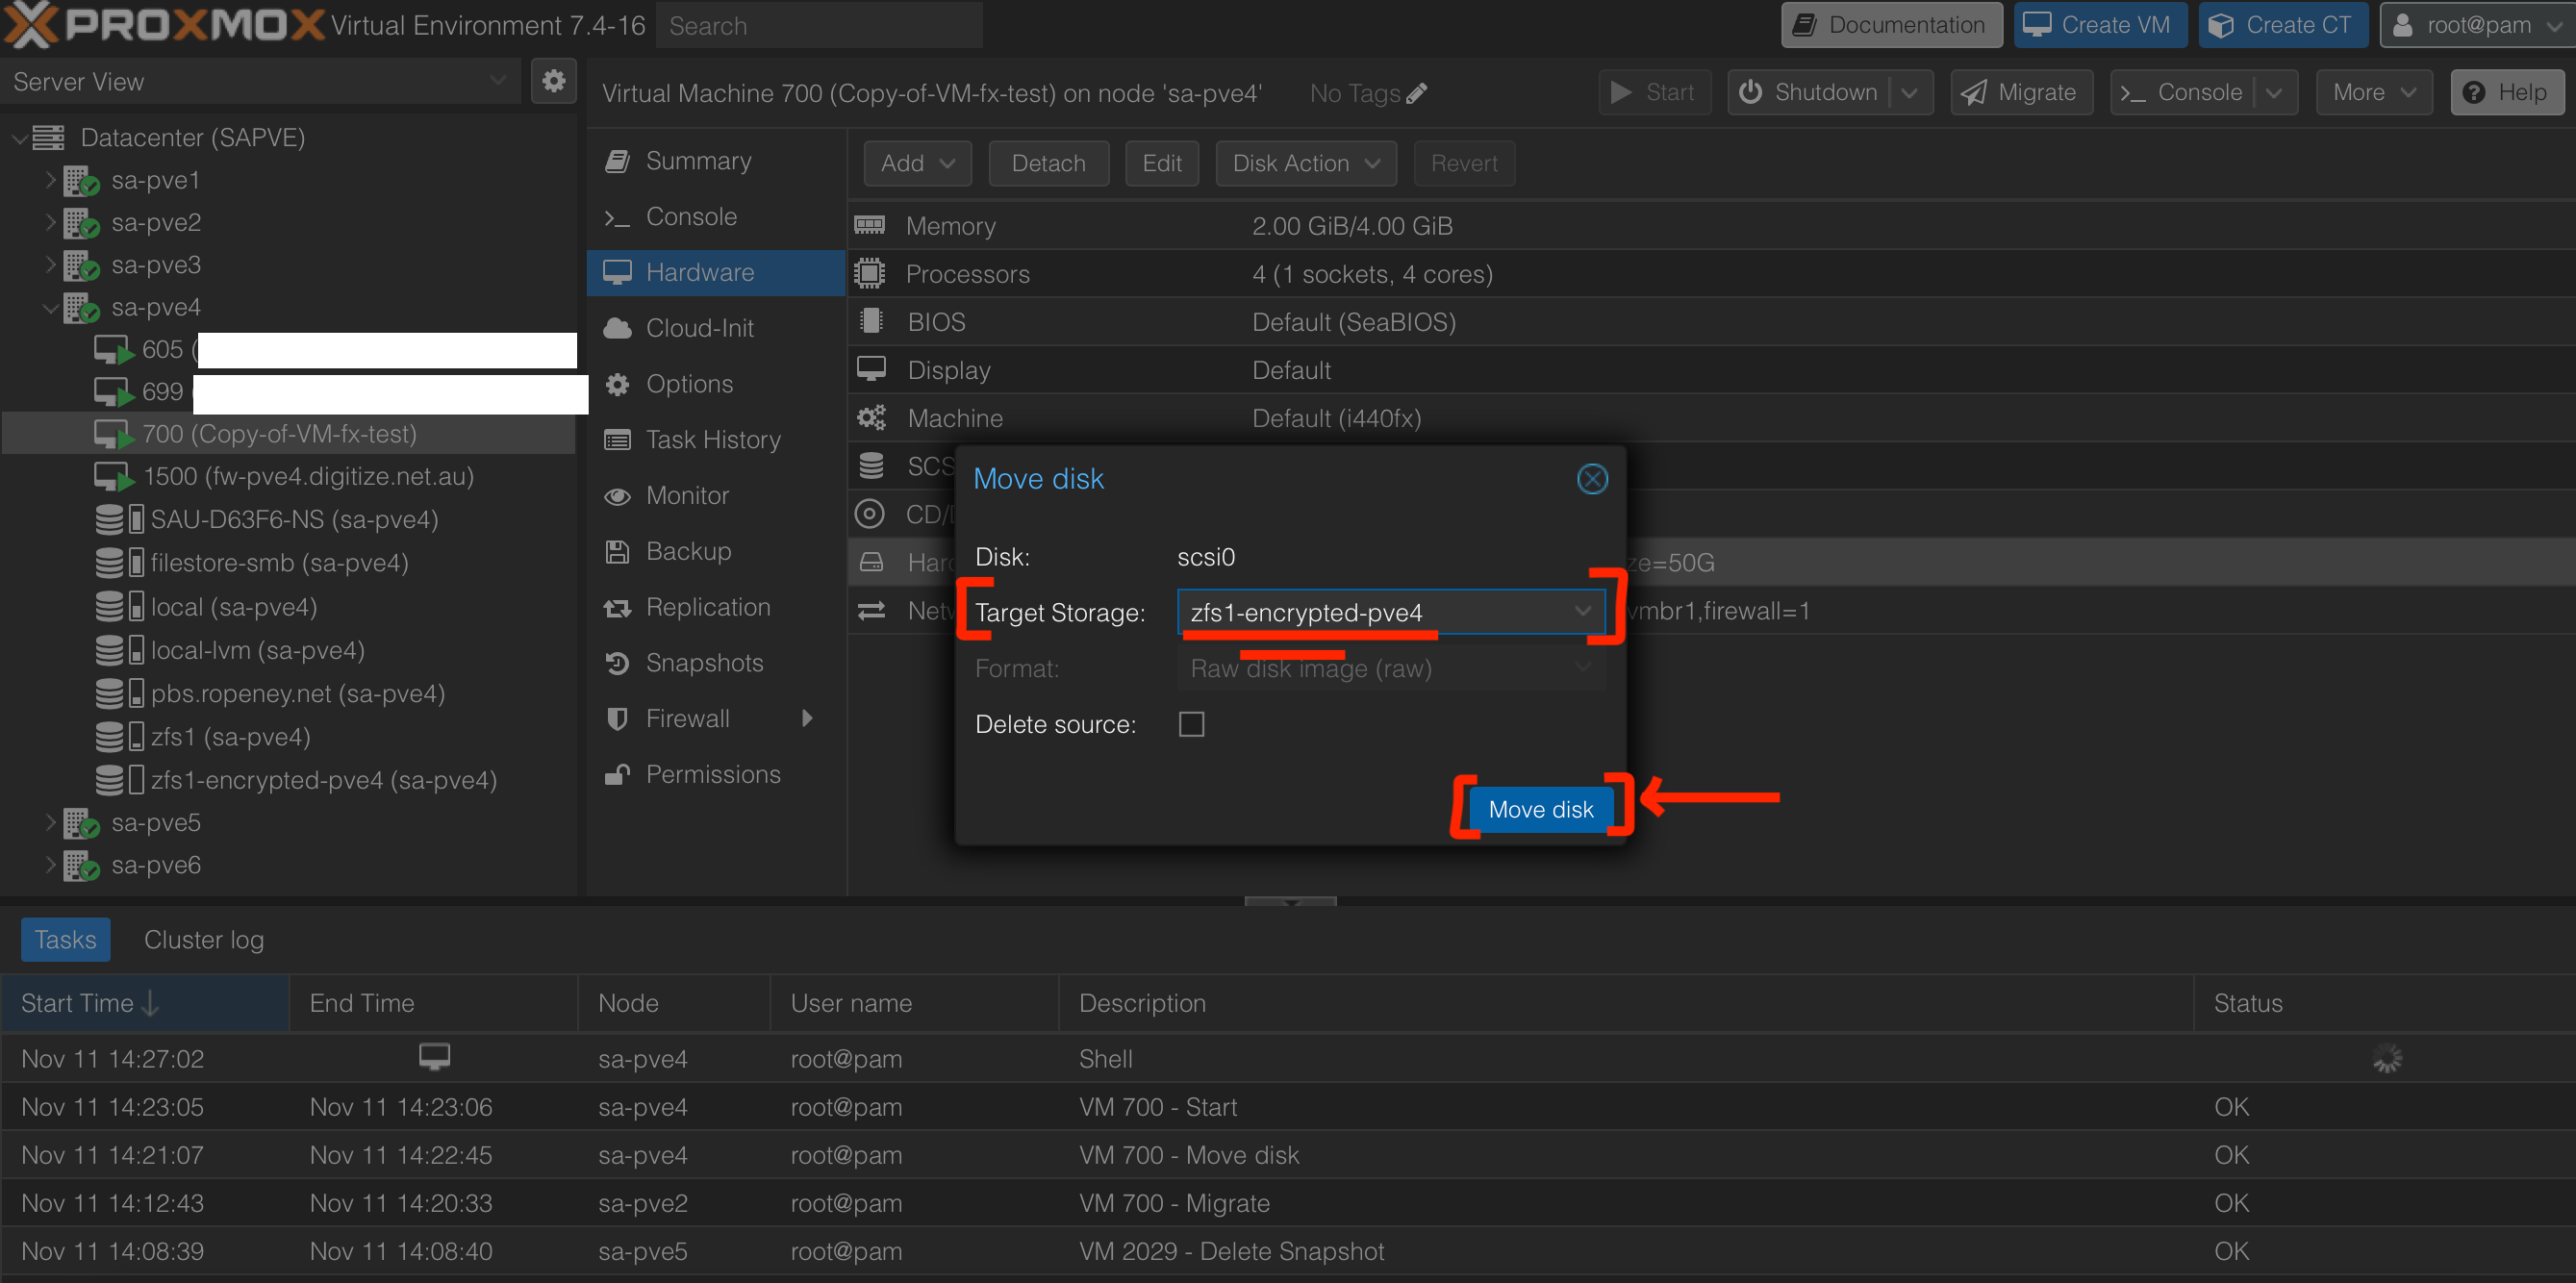
- In PVE dashboard, select the VM that we would like to move disk to encrypted ZFS pool
- For "Target Storage", select
zfs1-encrypted-pve4
- In shell of
sa-pve4, we can see that the VM 700 disk changes fromzfs1/vm-700-disk-0tozfs1/encrypted/vm-700-disk-0
root@sa-pve4:~# zfs list
NAME                           USED  AVAIL     REFER  MOUNTPOINT
zfs1                           274G  1.41T       96K  /zfs1
zfs1/encrypted                32.2G  1.41T      192K  /zfs1/encrypted
zfs1/encrypted/vm-700-disk-0  32.2G  1.41T     32.2G  -
zfs1/vm-4003-disk-0           33.0G  1.45T       56K  -
zfs1/vm-4003-disk-1           33.0G  1.45T       56K  -
zfs1/vm-605-disk-0             103G  1.43T     87.8G  -
zfs1/vm-699-disk-0            72.2G  1.44T     44.2G  -
Step 6: Reboot node for testing (with auto-unlock enabled)
- Reboot
sa-pve4node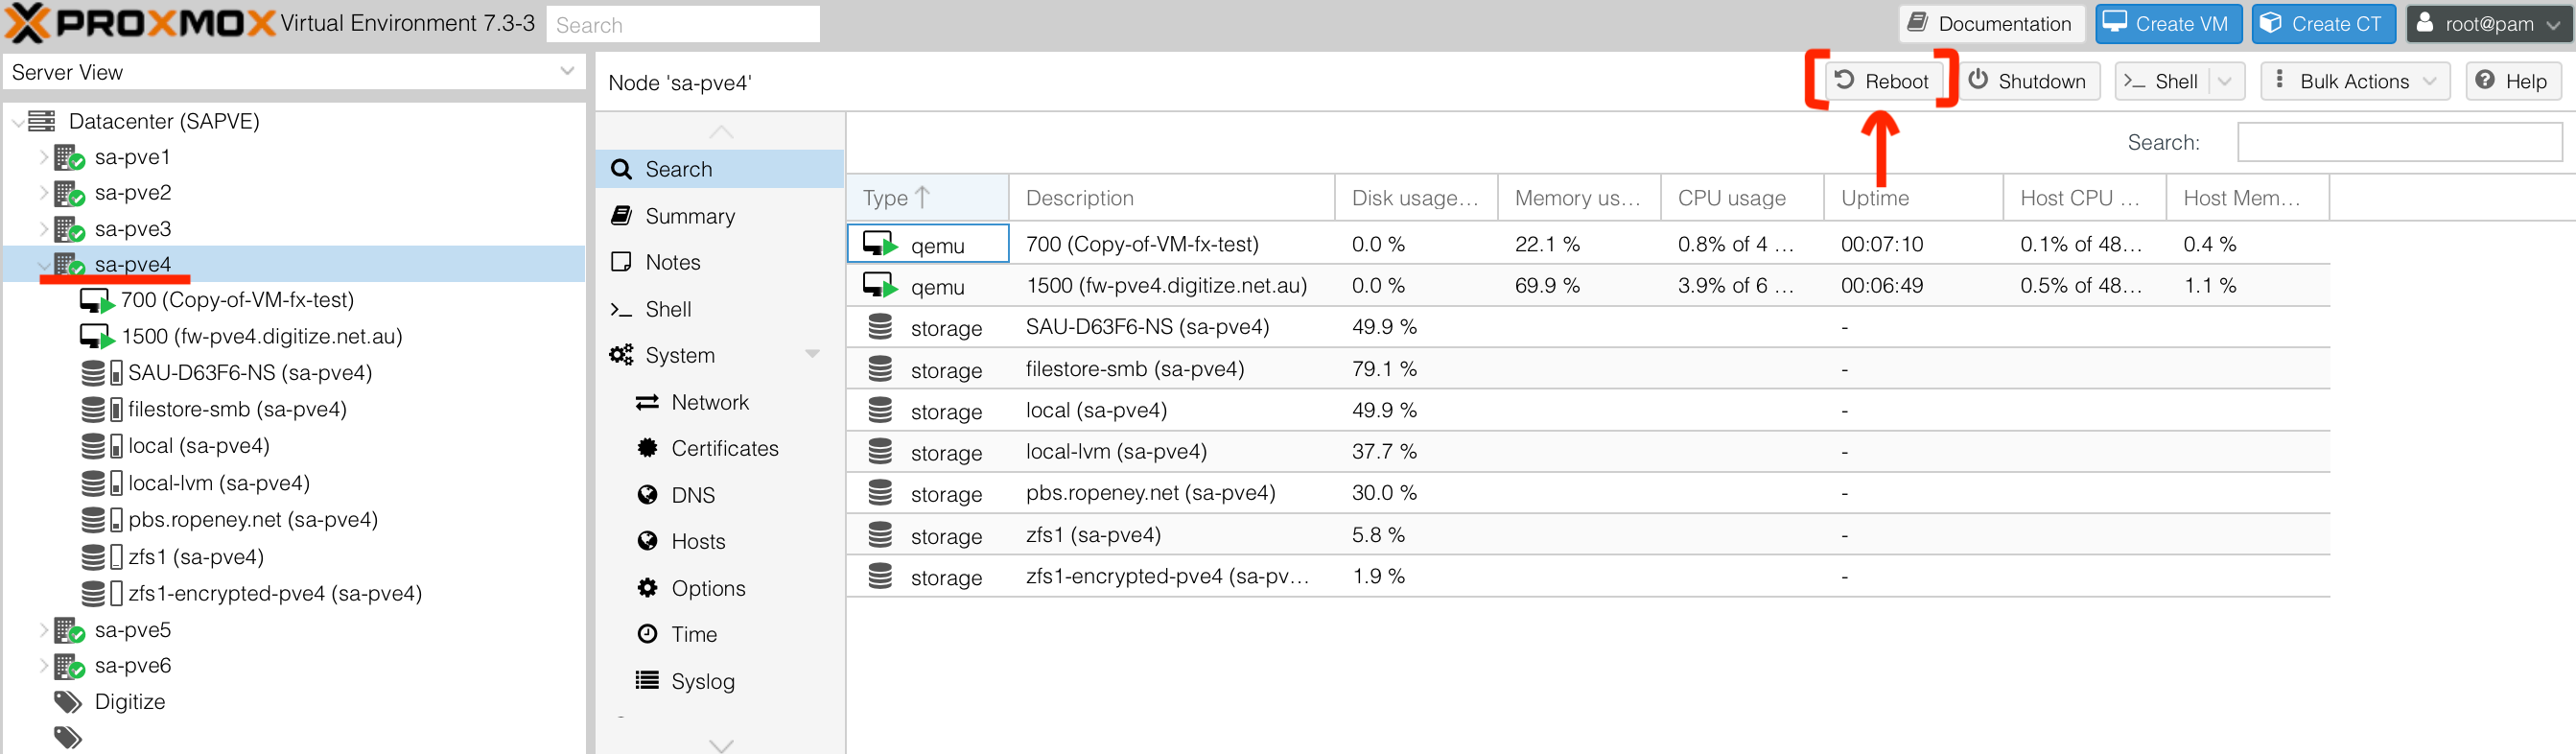
- Once rebooted successfully, click on "Shell" button
- Ensure that the
zfs1/encryptedencrypted ZFS dataset is unlocked and mounted automatically
Mounted successfully
root@sa-pve4:~# df -h
Filesystem              Size  Used Avail Use% Mounted on
zfs1                    1.6T  128K  1.6T   1% /zfs1
zfs1/encrypted          1.6T  256K  1.6T   1% /zfs1/encrypted
Unlocked successfully
root@sa-pve4:~# zfs get encryption,keylocation,keyformat,keystatus zfs1/encrypted
NAME            PROPERTY     VALUE                    SOURCE
zfs1/encrypted  encryption   aes-256-gcm              -
zfs1/encrypted  keylocation  file:///root/zfskey.bin  local
zfs1/encrypted  keyformat    raw                      -
zfs1/encrypted  keystatus    available                -
Step 7: Reboot node for testing (without auto-unlock enabled)
- In shell of
sa-pve4, disable the "auto-unlock" service at boot
systemctl disable zfs-load-key@zfs1-encrypted.service
- Check "auto-unlock" service is disabled
systemctl is-enabled zfs-load-key@zfs1-encrypted.service
- Reboot
sa-pve4node - Once rebooted successfully, click on "Shell" button
- The
zfs1/encryptedencrypted ZFS dataset SHOULD NOT BE unlocked or mounted
Mounted unsuccessfully
root@sa-pve4:~# df -h
Filesystem            Size  Used Avail Use% Mounted on
zfs1                  1.6T  128K  1.6T   1% /zfs1
Unlocked unsuccessfully
root@sa-pve4:~# zfs get encryption,keylocation,keyformat,keystatus zfs1/encrypted
NAME            PROPERTY     VALUE                    SOURCE
zfs1/encrypted  encryption   aes-256-gcm              -
zfs1/encrypted  keylocation  file:///root/zfskey.bin  local
zfs1/encrypted  keyformat    raw                      -
zfs1/encrypted  keystatus    unavailable              -
- The VM configured "Target Storage" with
zfs1-encrypted-pve4would not be started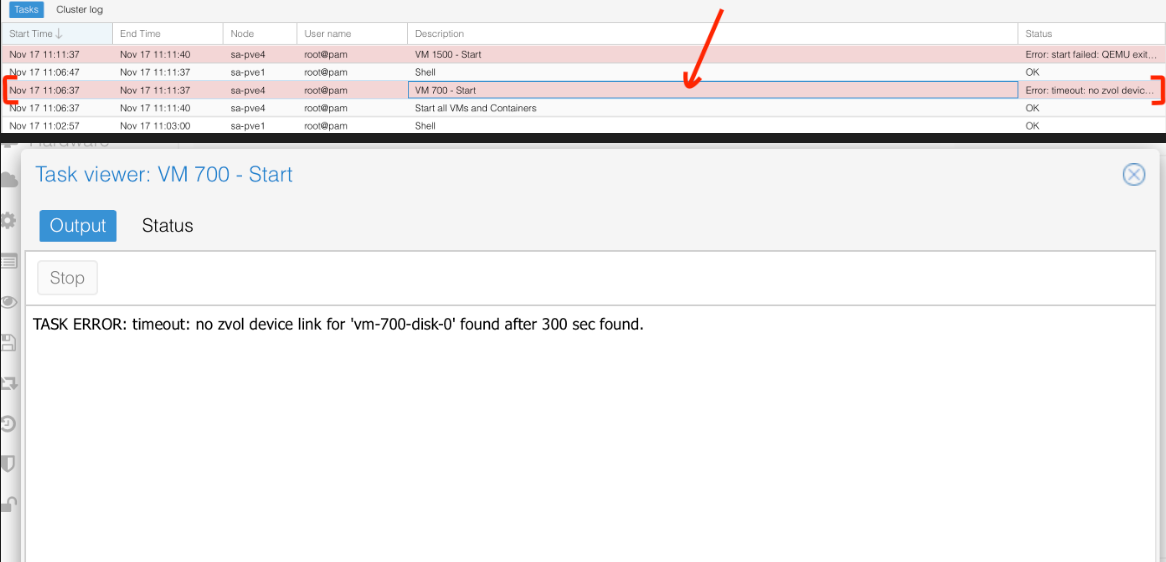
- Manually unlock
zfs load-key zfs1/encrypted
Result
root@sa-pve4:~# zfs get encryption,keylocation,keyformat,keystatus zfs1/encrypted
NAME            PROPERTY     VALUE                    SOURCE
zfs1/encrypted  encryption   aes-256-gcm              -
zfs1/encrypted  keylocation  file:///root/zfskey.bin  local
zfs1/encrypted  keyformat    raw                      -
zfs1/encrypted  keystatus    available                -
ZFS encryption (using remote key)
For environments where security and centralized control are top priorities, unlocking ZFS encryption with a remote key provides the strongest and most flexible solution. Instead of storing the key locally, the Proxmox host retrieves it securely from an external system—such as an API endpoint, HashiCorp Vault, a password manager with API access, or a dedicated key management server.
This method ensures the encrypted datasets stay locked by default until the host successfully authenticates against your key server. Even if someone steals the drives and the boot disk, they still cannot decrypt the VM storage without access to the remote key infrastructure.
A typical workflow looks like this:
- During boot, a small script (e.g. /etc/zfs/keyfetch.sh) runs before the ZFS import.
- The script authenticates to your remote service (via token, certificate, VPN tunnel, or hardware-bound credential).
- If the request is authorized, the server sends back the encryption key.
- The key is piped directly into zfs load-key without ever touching persistent storage.
This approach is ideal for MSPs, enterprise clients, and secure hosting environments where keys must remain off-host and centrally managed. It also allows you to revoke or rotate keys without touching each Proxmox node—great for long-term operational security.
Step 1: Create encrypted ZFS dataset
- Open shell of
sa-pve4 - Create key
dd if=/dev/urandom of=/root/zfskey.bin bs=32 count=1
chmod 600 /root/zfskey.bin
chown root:root /root/zfskey.bin
- Encode binary key to base64
base64 /root/zfskey.bin > /root/zfskey.b64
- Create encrypted ZFS dataset with
/root/zfskey.bin
zfs create \\
  -o encryption=aes-256-gcm \\
  -o keyformat=raw \\
  -o keylocation=file:///root/zfskey.bin \\
  zfs1/encrypted-with-remote-key
- Confirm
/zfs1/encrypted-with-remote-keyencrypted ZFS dataset is created
root@sa-pve4:~# zfs list
NAME                             USED  AVAIL     REFER  MOUNTPOINT
zfs1                            99.0G  1.58T       96K  /zfs1
zfs1/encrypted-with-remote-key   192K  1.58T      192K  /zfs1/encrypted-with-remote-key
- Check encryption configuration of
zfs1/encrypted-with-remote-keyencrypted ZFS dataset *** If thekeystatusisavailable, it means that thezfs1/encrypted-with-remote-keyencrypted ZFS dataset is UNLOCKED ***
root@sa-pve4:~# zfs get encryption,keylocation,keyformat,keystatus zfs1/encrypted-with-remote-key
NAME                            PROPERTY     VALUE                    SOURCE
zfs1/encrypted-with-remote-key  encryption   aes-256-gcm              -
zfs1/encrypted-with-remote-key  keylocation  file:///root/zfskey.bin  local
zfs1/encrypted-with-remote-key  keyformat    raw                      -
zfs1/encrypted-with-remote-key  keystatus    available                -
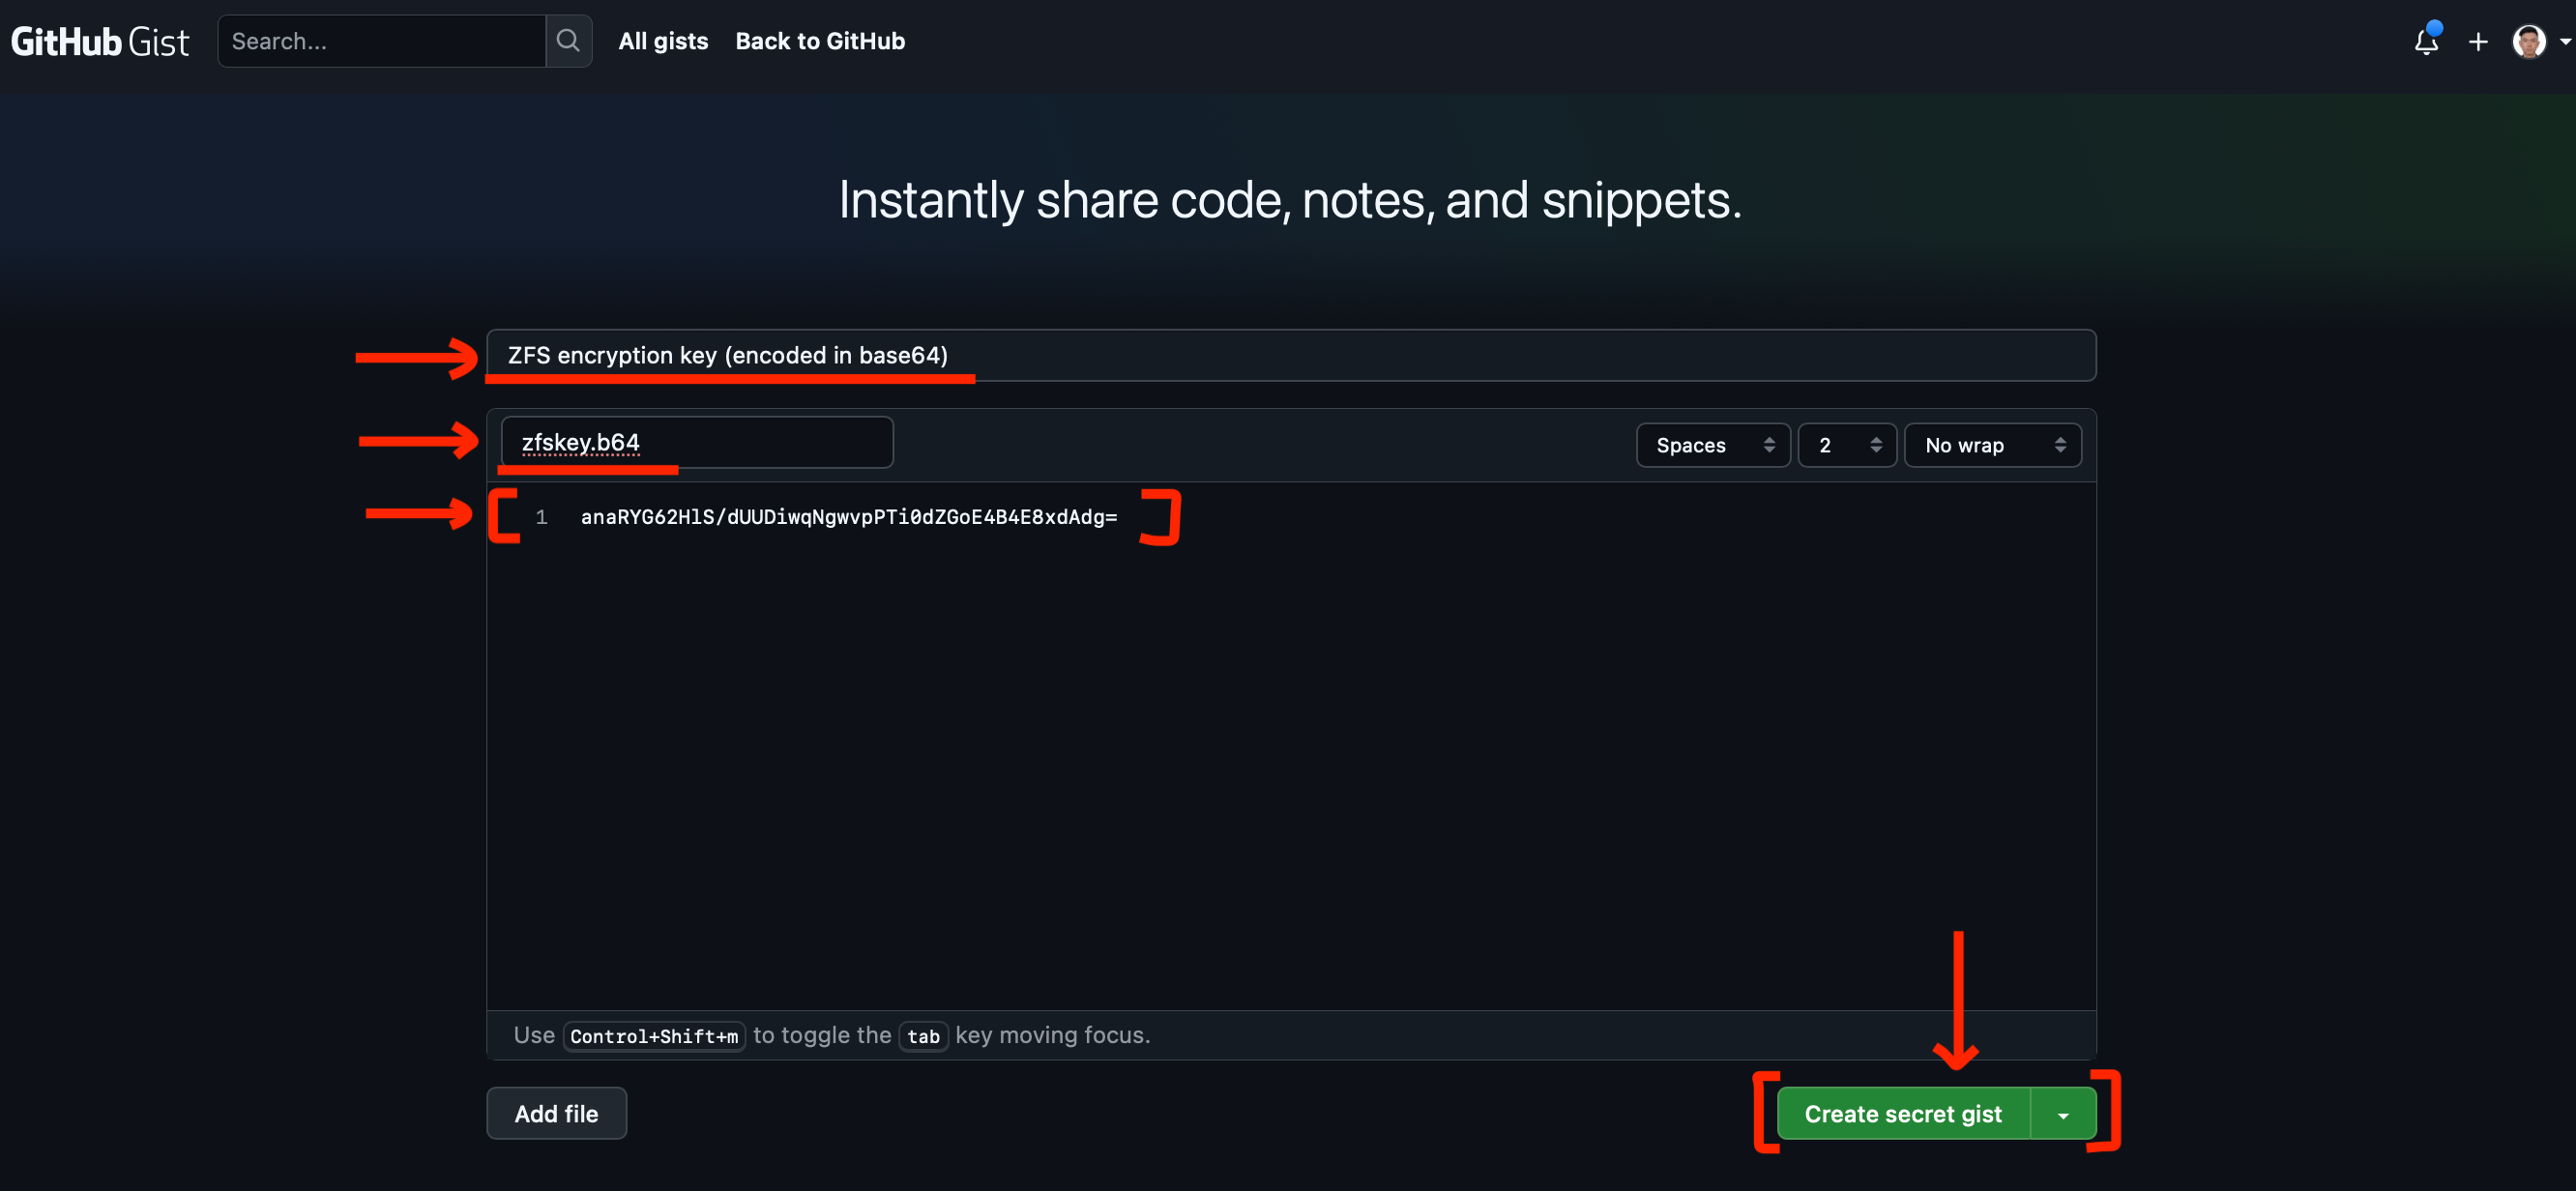
Step 2: Setup remote key
In our example, we will use a private gist. However, there are many better ways to do this, but this is the easiest for a tutorial.
Remember, if you are encrypting using a remote key, your Proxmox node will require an internet connection before it can decrypt volumes!
- Open shell of
sa-pve4 - Get the content of
/root/zfskey.b64 - Visit https://gist.github.com/
- Create a gist
- Click on "Raw" button
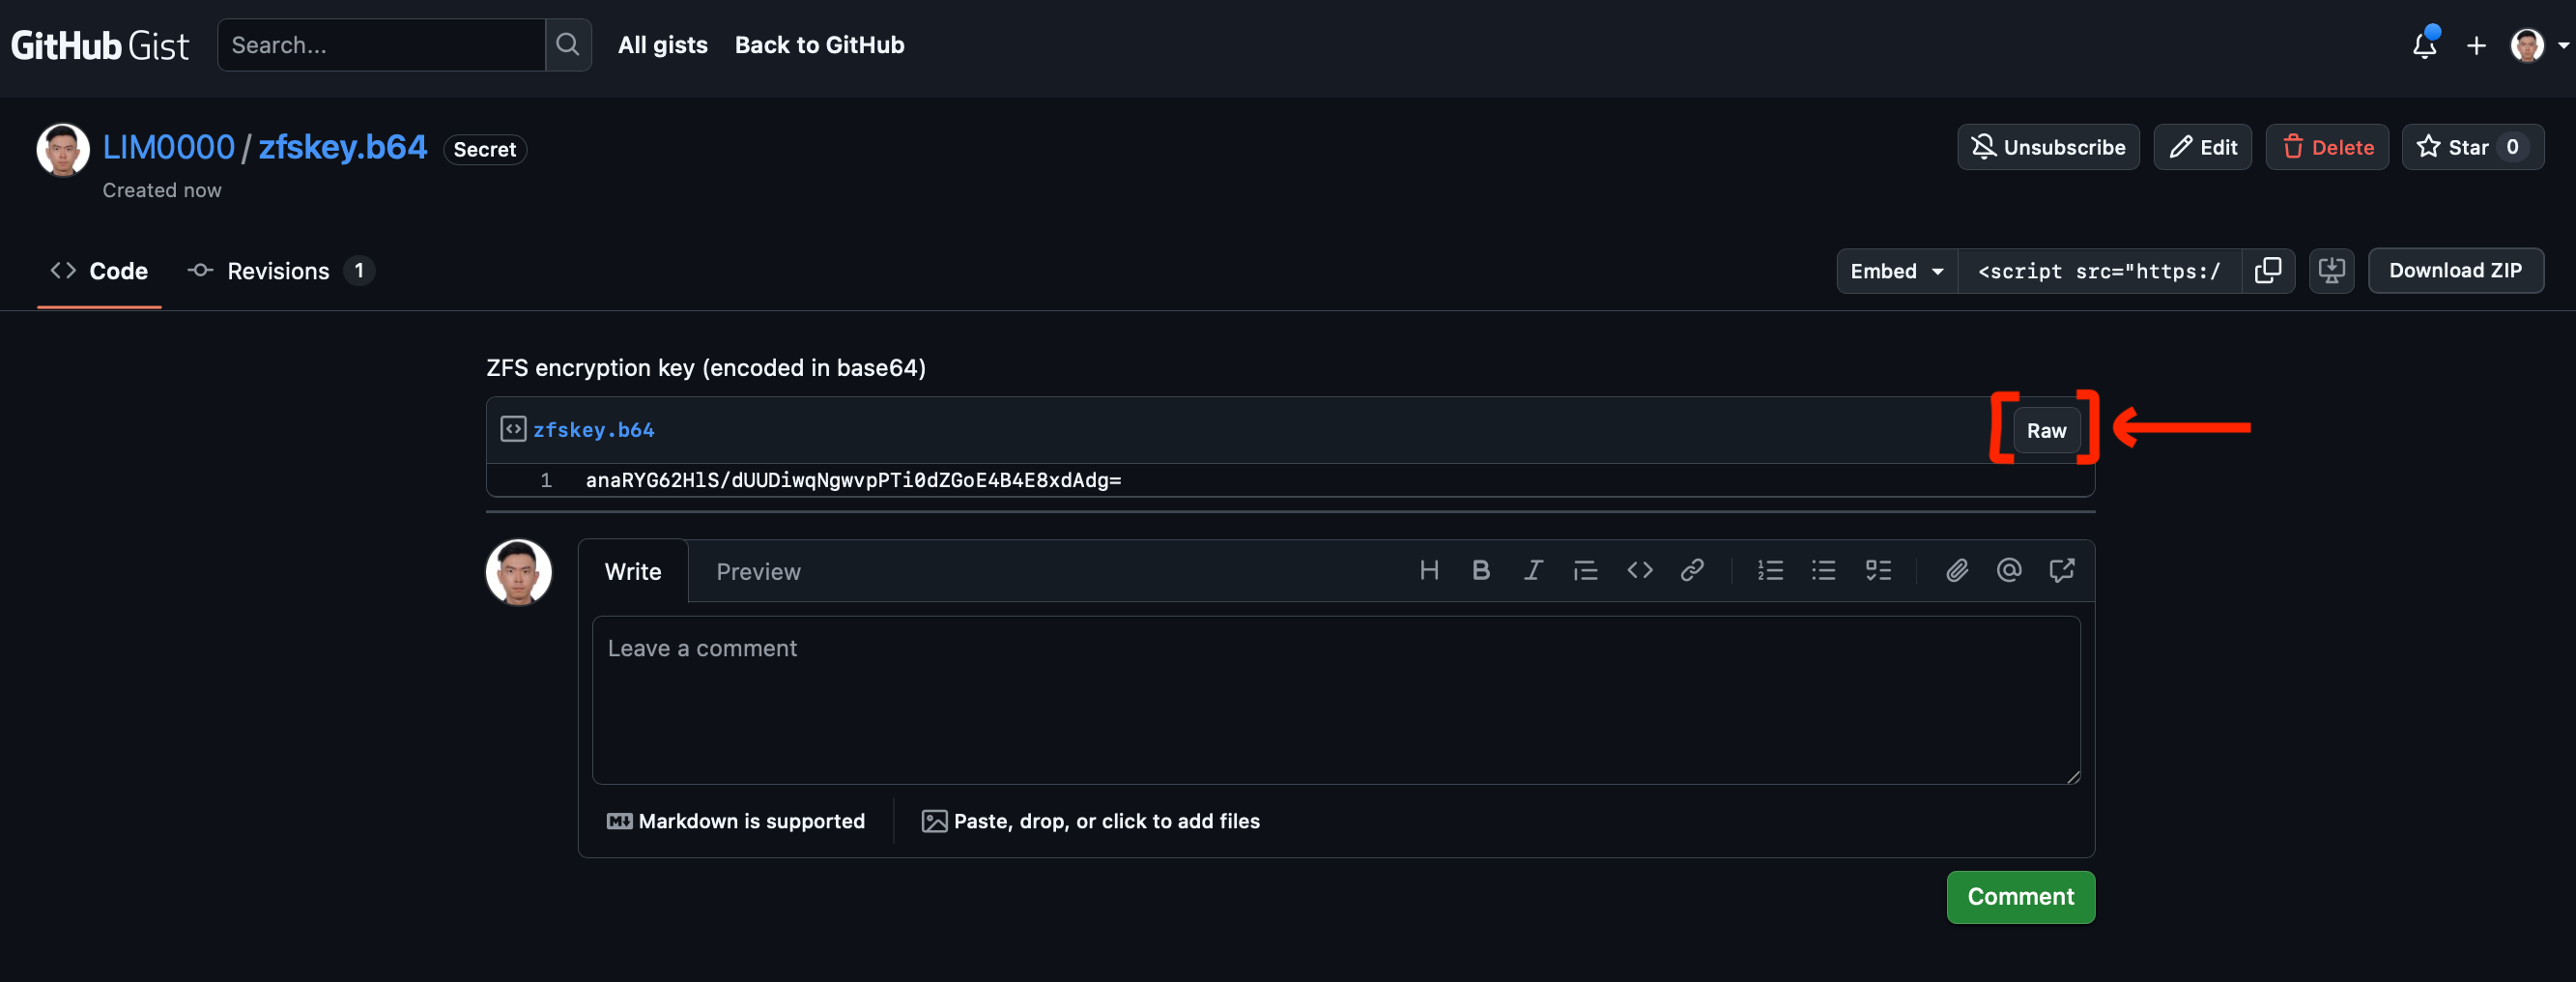
- Get the URL

- Open shell of
sa-pve4 - In shell of sa-pve4, ensure that we could get the base64 encoded value with the URL
curl -X GET <GITHUB_GIST_URL>
Step 3: Create script to fetch remote key
- Create
unlock_with_remote_key.sh
touch /root/unlock_with_remote_key.sh
- In
unlock_with_remote_key.sh, add the following
#!/bin/bash

URL="<GITHUB_GIST_URL>"
curl -s "$URL" | tr -d '\\n' | base64 --decode > /root/zfskey.bin
zfs load-key zfs1/encrypted-with-remote-key
rm /root/zfskey.bin
- Ensure
roothas permission to execute theunlock_with_remote_key.shscript
chmod u+x unlock_with_remote_key.sh
Step 4: Auto-unlock encrypted ZFS dataset
- Create
zfs-load-key@zfs1-encrypted-with-remote-key.servicefile
touch /etc/systemd/system/zfs-load-key@zfs1-encrypted-with-remote-key.service
- In
zfs-load-key@zfs1-encrypted-with-remote-key.servicefile, add the following
[Unit]
Description=Unlock ZFS dataset zfs1/encrypted-with-remote-key
After=zfs-import.target network-online.target
Wants=network-online.target

[Service]
Type=oneshot
ExecStart=/root/unlock_with_remote_key.sh

[Install]
WantedBy=zfs-mount.service
- Enable the "auto-unlock" service at boot
systemctl enable zfs-load-key@zfs1-encrypted-with-remote-key.service

Created symlink /etc/systemd/system/zfs-mount.service.wants/zfs-load-key@zfs1-encrypted-with-remote-key.service → /etc/systemd/system/zfs-load-key@zfs1-encrypted-with-remote-key.service.
- Check "auto-unlock" service is enabled
systemctl is-enabled zfs-load-key@zfs1-encrypted-with-remote-key.service
Step 5: Reboot node for testing
- Reboot
sa-pve4node - Once rebooted successfully, click on "Shell" button
- Ensure that the
zfs1/encrypted-with-remote-keyencrypted ZFS dataset is unlocked and mounted automatically
- Mounted successfully
root@sa-pve4:~# df -h
Filesystem                      Size  Used Avail Use% Mounted on
zfs1                            1.6T  128K  1.6T   1% /zfs1
zfs1/encrypted-with-remote-key  1.6T  256K  1.6T   1% /zfs1/encrypted-with-remote-key
- Unlocked successfully
root@sa-pve4:~# zfs get encryption,keylocation,keyformat,keystatus zfs1/encrypted-with-remote-key
NAME                            PROPERTY     VALUE                    SOURCE
zfs1/encrypted-with-remote-key  encryption   aes-256-gcm              -
zfs1/encrypted-with-remote-key  keylocation  file:///root/zfskey.bin  local
zfs1/encrypted-with-remote-key  keyformat    raw                      -
zfs1/encrypted-with-remote-key  keystatus    available                -
ZFS encryption (using manual passphrase)
Unlocking ZFS encryption with a manual passphrase is the simplest and most secure method from a cryptographic standpoint. Instead of storing keys locally or retrieving them from a remote system, the dataset is unlocked only when an administrator physically (or through console access) enters the passphrase during boot.
With this method, your encrypted VM storage remains fully protected until a human enters the correct passphrase. This makes it ideal for:
- Standalone hosts
- High-security on-premises deployments
- Environments where physical or out-of-band console access is available
- Situations where you want to guarantee no automatic decryption
Because no keyfiles or remote systems are involved, the security boundary is extremely tight: even if someone steals all storage devices and the boot drive, the data remains inaccessible without the passphrase.
Typical workflow:
- System boots and reaches the point where encrypted ZFS datasets need to be imported.
- The system waits for user input and prompts for the passphrase.
- Once entered, ZFS unlocks the dataset and the VM storage becomes available.
- This method provides maximum data confidentiality, but it does require human action during every reboot—so it’s best suited for hosts where reboots are rare or where operational workflows already include console access at boot time.
Step 1: Create encrypted ZFS dataset
- Open shell of
sa-pve4 - Create encrypted ZFS dataset
zfs create \
  -o encryption=aes-256-gcm \
  -o keyformat=passphrase \
  -o keylocation=prompt \
  zfs1/encrypted-with-passphrase
- Confirm
/zfs1/encrypted-with-passphraseencrypted ZFS dataset is created
root@sa-pve4:~# zfs list
NAME                             USED  AVAIL     REFER  MOUNTPOINT
zfs1                            99.0G  1.58T       96K  /zfs1
zfs1/encrypted-with-passphrase   192K  1.58T      192K  /zfs1/encrypted-with-passphrase
- Check encryption configuration of
zfs1/encrypted-with-passphraseencrypted ZFS dataset
*** If the keystatus is available, it means that the zfs1/encrypted-with-passphrase encrypted ZFS dataset is UNLOCKED ***
zfs get encryption,keylocation,keyformat,keystatus zfs1/encrypted-with-passphrase

root@sa-pve4:~# zfs get encryption,keylocation,keyformat,keystatus zfs1/encrypted-with-passphrase
NAME                            PROPERTY     VALUE        SOURCE
zfs1/encrypted-with-passphrase  encryption   aes-256-gcm  -
zfs1/encrypted-with-passphrase  keylocation  prompt       local
zfs1/encrypted-with-passphrase  keyformat    passphrase   -
zfs1/encrypted-with-passphrase  keystatus    available    -
- Mount encrypted ZFS dataset
zfs mount zfs1/encrypted-with-passphrase
Step 2: Reboot node for testing
- Reboot the Proxmox node
- Once rebooted successfully, click on "Shell" button
- Ensure that the zfs1/encrypted-with-passphrase encrypted ZFS dataset is locked and not mounted by default
Not mounted by default
root@sa-pve4:~# df -h
Filesystem            Size  Used Avail Use% Mounted on
zfs1                  1.6T  128K  1.6T   1% /zfs1
Locked by default
root@sa-pve4:~# zfs get encryption,keylocation,keyformat,keystatus zfs1/encrypted-with-passphrase
NAME                            PROPERTY     VALUE        SOURCE
zfs1/encrypted-with-passphrase  encryption   aes-256-gcm  -
zfs1/encrypted-with-passphrase  keylocation  prompt       local
zfs1/encrypted-with-passphrase  keyformat    passphrase   -
zfs1/encrypted-with-passphrase  keystatus    unavailable  -
Manually unlock
root@sa-pve4:~# zfs load-key zfs1/encrypted-with-passphrase
Enter passphrase for 'zfs1/encrypted-with-passphrase':
Result
root@sa-pve4:~# zfs get encryption,keylocation,keyformat,keystatus zfs1/encrypted-with-passphrase
NAME                            PROPERTY     VALUE        SOURCE
zfs1/encrypted-with-passphrase  encryption   aes-256-gcm  -
zfs1/encrypted-with-passphrase  keylocation  prompt       local
zfs1/encrypted-with-passphrase  keyformat    passphrase   -
zfs1/encrypted-with-passphrase  keystatus    available    -
Need Help With Proxmox or Secure Virtualization?
If you want Proxmox ZFS encryption set up correctly—or you need help designing a secure, high-availability virtualisation environment—we can do it for you.
Whether it’s configuring encrypted VM storage, hardening your hypervisor, setting up automated backups, or managing your entire Proxmox infrastructure, our team can assist with:
- Proxmox installation, upgrades, and migrations
- ZFS encrypted storage design (keyfile, passphrase, or remote key)
- Firewalling, VPNs, and secure remote access
- Backup and disaster recovery planning
- Performance tuning and ongoing maintenance
If you’d like this implemented in your environment—or you need reliable Proxmox support—get in touch and we’ll be happy to help.